Build an HVR Hub without underlying database
In recent years, the data integration/replication space has stared to become crowded. Products like Oracle GoldenGate have become stables inside of organizations, but companies like HVR are chipping away at that marketshare. Since I left Oracle, I’ve been evaluating and looking at some of these data integration/replication tools and I like HVR. HVR provides some of the same concepts as Oracle GoldenGate for moving data; at the same time they are giving a lot more for customers to use. Items like:
- A hub – A hub in HVR is the central catalog for all the replication channels and enables many of the advanced features within the product.
Typically a HVR hub requires that the underlying database to be installed on the same server where the hub process is running. In this blog post, I’ll show you how you can use your existing Oracle Database as the repository for the HVR hub without it needing to install the Oracle Database on the same machine.
The software you need for this to be successful is the following:
- hvr-5.6.5_10-linux_glibc2.5-x64-64bit_ea.tar.gz
- instantclient-sqlplus-linux.x64-19.6.0.0.0dbru.zip
- Oracle Enterprise Linux 7.5 or later (really any linux x64-86 machine would do)
Build
To make this installation simpler and I’m using this in a development environment, so vagrant is my tool of choice. By using Vagrant I can quickly build my linux box by simply saying “vagrant up”. Below is the code that I use for my Vagrant box.
# vi: set ft=ruby :
require 'yaml'

# Vagrantfile API/syntax version. Don't touch unless you know what you're doing!
VAGRANTFILE_API_VERSION = "2"

#-----------------------------------------
# Variables
#-----------------------------------------
params = YAML.load_file './config/variables.yaml'

# Shared
var_box_image = params['shared']['box']
var_box_url = params['shared']['url']

# Environment
var_name = params['env']['name']

#-------------------------------------------
# set virtual machine specific items
#-------------------------------------------

Vagrant.configure(VAGRANTFILE_API_VERSION) do |config|

config.vm.network "private_network", :auto_network => true
config.vm.box = var_box_image
config.vm.box_url = var_box_url
config.vm.hostname = var_name

config.vm.provider "virtualbox" do |v|
v.name=var_name
v.memory = 1024
v.cpus = 2
end

# Enable ssh password authentication
config.vm.provision "shell", inline: <<-SHELL
sed -i 's/PasswordAuthentication no/PasswordAuthentication yes/g' /etc/ssh/sshd_config
/bin/systemctl restart sshd
SHELL

config.vm.provision "ansible" do |ansible|
ansible.playbook = "../Playbooks/hvr56_softwareinstall.yaml"
end
end
You will notice that at the end of the Vagrant script, I’m making a call to Ansible. This is to install the required software needed for HVR and Oracle Client to work. This only installs the software so I’m not going to share the Ansible code at this time. What I want you to focus on is how to configure the box to use an existing database.
Configure
With an up and running machine, I want to connect to a database I already have running but is not on the hub machine. In order to do this, I have to configure the HVR user to now where the Oracle binaries are. This is easily done by updating the .bashrc file. Taking a look at the .bashrc file that is configured, you see that there are environment variables for HVR as well as Oracle.
export HVR_HOME=/opt/app/hvr56/hvr_home
export HVR_CONFIG=/opt/app/hvr56/hvr_config
export HVR_TMP=/tmp
export LD_LIBRARY_PATH=/opt/app/oracle/product/client_19c/lib
export TNS_ADMIN=/opt/app/oracle/network/admin
export PATH=$HVR_HOME/bin:$PATH
By looking at the .bashrc file, you will notice that the LD_LIBRARY_PATH is pointing to the lib directory for the Oracle Instant Client that is installed. Additionally, it is specifying where to find the tnsnames.ora file. Both of these items are key for connecting HVR to the remote database for hub purposes. All the other environment variables that are set are for HVR to use. What needs to be done next, is to create a tnsnames.ora file on the hub machine and ensure that it is in th e$TNS_ADMIN directory. The contents of the tnsnames.ora file I’m using is as follows:
[oracle@hvr56-hub admin]$ cat tnsnames.ora
HVR =
(DESCRIPTION =
(ADDRESS = (PROTOCOL = TCP)(HOST = 10.20.1.2)(PORT = 1539))
(CONNECT_DATA =
(SERVER = DEDICATED)
(SERVICE_NAME = hvrpdb1.oracle.com)
)
)
Notice that I’m using the pluggable database hvrpdb1.oracle.com (the .oracle.com domain extension is only because I didn’t fix my scripts for building the database). This is the pluggable database that HVR will build its repository catalog once the HVR hub has been registered with the database.
Register HVR Hub
With the Oracle Instanct Client software installed and the tnsnames.ora file established, now is the time to register the HVR hub with the database. In order to do this, access the server directly via a GUI method. I’m using VNC in this case. Once connected to an xterm or a GUI desktop, open a terminal window and navigate to the $HVR_HOME/bin directory. From here, run the program hvrgui.
$ cd $HVR_HOME/bin
$ ./hvrgui &
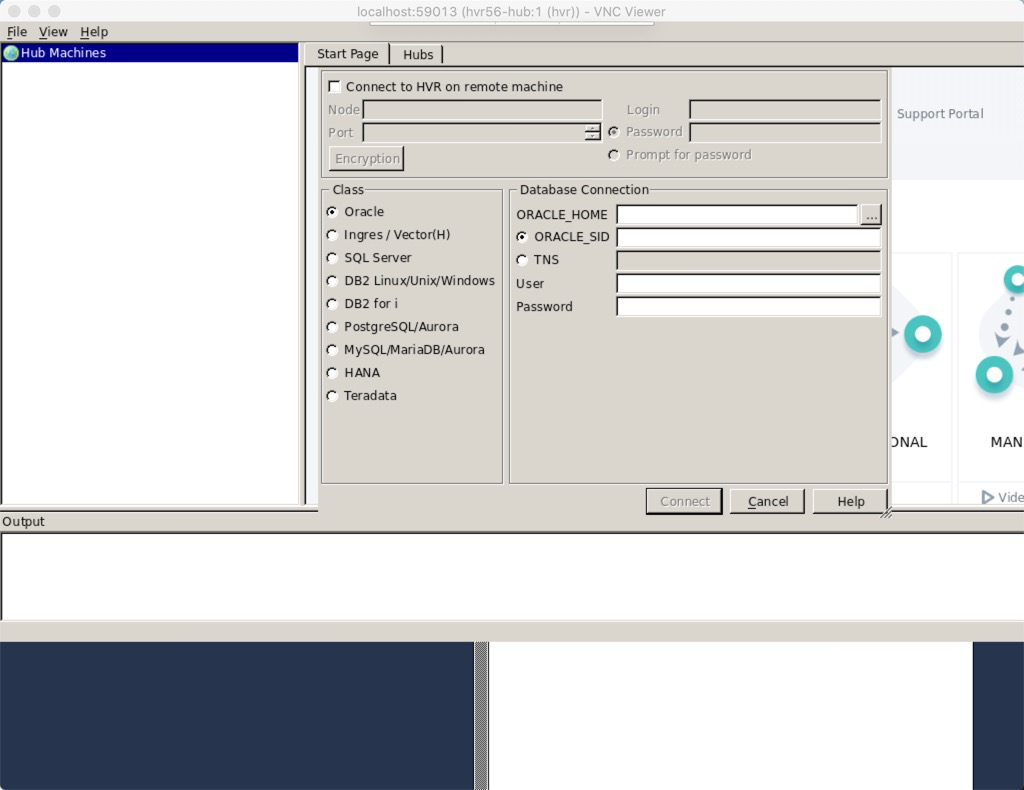
This will bring up the GUI environment for HVR but also present you with the dialog box to register the HVR Hub.

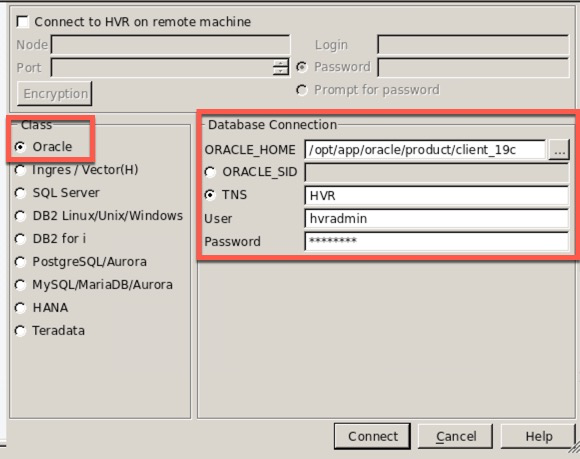
On the hub registration page, you only need to make sure you select the right radio button under Class for the database that will be used as the repository and the provide connection details to the right of the it. As highlighted at the beginning of the post, Oracle is the database for the repository. I make sure the radio button for Oracle is selected and the provide the details needed.
ORACLE_HOME=/opt/app/oracle/product/client_19c
TNS=HVR
User=hvradmin
Password=<password>

Once all the settings have been provided, clicking Connect will make the connection to the pluggable database and build the HVR repository catalog. If the repository is already there from an existing build, the tables will be reused. If the tables are not there, then you will be prompted and told that they would be built. Since I’ve already built the repository during testing, the HVR GUI just makes the connection and uses the existing tables.
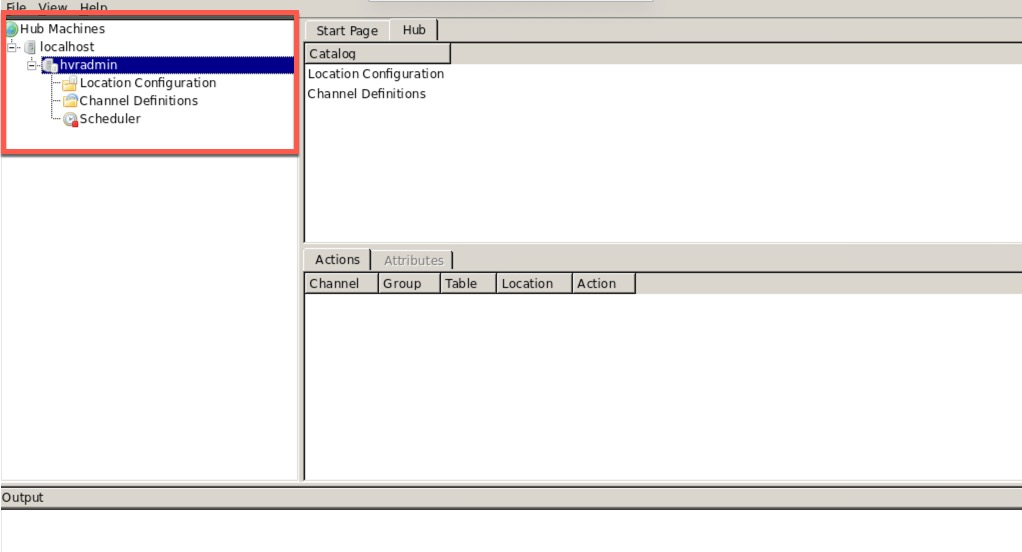
After the repository is built and connected, the HVR GUI changes to show you the it is connected and ready to use.

At this point, you can quickly setup your locations, channels and schedule when replication should start while only having a single connection of a repository database.
Enjoy!!!


