
Building OCI Compute Nodes via Code
Over the last couple of posts, we’ve been showing how to use the OCI provider and upgrading the...
Over the last few months, I’ve been working to convert my skills from a core DBA/Replication specialist into a from dynamic DevOps persona. Part of this is looking at all of the cloud providers out there and getting an understanding of what is going on and how to maximize interaction with each of these platforms. I’ve taken at look at AWS, Azure, and Oracle Cloud Infrastructure (OCI). Yes, I know GCP is out there as well, but I was just getting out of my comfort zone a bit, yet staying close to home with OCI.
Prior to leaving Oracle, I wrote a blog post on how to install HashiCorp Terraform on the MacOS (here). This was the start of me using Terraform with OCI. At the time, I was mostly using Terraform to work with OCI Marketplace implementation of of Oracle GoldenGate. Yes, everything that is done with OCI Marketplace images are done with Terraform. So it was a great introduction to Terraform.
In this post, I want to tackle how to configure the OCI Provider for Terraform. The first thing you have to understand is that “providers” are responsible for understanding API interactions and exposing the resources required. These “providers” generally provide access to the IaaS (AWS, Azure, OCI, GCP), PaaS, or Sass services.
For Terraform to work, it has to know what “provider” is going to be used. This basically says what IaaS platform is going to be used, what APIs are exposed, and how to interact with the framework. This is typically done in what is called a “provider block”. In doing research, I’ve seen a few people put this code in a “provider.tf” file, but my preference it to put this “provider block” at the top of my main.tf file. This provides a sense of quick access for knowing what provider is being used for the set of files being used. There are reasons to use “provider.tf”, but for my purposes with OCI, I didn’t find it needed.
A provider block for OCI looks similar to this:
provider “oci” {
    tenancy_ocid = var.tenancy_ocid
    user_ocid = var.user_ocid
    fingerprint = var.fingerprint
    private_key_path = var.private_key_path
    regions = var.region
}
Now the above “provider block” is not formatted in proper HCL language, but it does work and shows what information is needed to make the OCI provider work. Also notice that there are a lot of variables that are being used (var.*). These variables need to be defined in a variables file that will be referenced within the same directory. If we were to replace these variables with actual values, the provider block would look something like this:
provider “oci” {
    tenancy_ocid = "ocid1.tenancy.oc1..aaaaaaaaojorxd……..lweivou6xeomto4gvjxuuyraxc……….”
    user_ocid = "ocid1.user.oc1..aaaaaaaavwqmadvq……..xlcszpsh4b54wsc7c23ciktpk……….”
    fingerprint = “..:16:cd:13:46:98:15:cb:18:cc:e8:44:52:cd:e8:..”
    private_key_path = "/Users/bocurtis/.ssh/<key_file>.pem”
    regions = "us-ashburn-1"
}
That is a bit messy! Using variables are to the advantage when setting up a provider or anything within the Terraform structure. I’ll write another post at a later date covering variables, but know that variables are easier and the preferred way of doing things with Terraform.
Now that we understand what is needed to establish an OCI connection using the Terraform provider for OCI, where does all this information come from? The obvious answer is from OCI, but where in OCI? The easiest way to find this information is to use the OCI command line tool, but this has to be configured with the same information as the Terraform provider. Not going to discuss how to install the OCI command line, but that can be found here. Although the easiest way is from the command line, to use either or all the information has to be gathered manually using the web UI. Once this information pulled together than you can access OCI using the command line tool or by code using Terraform.
To find the tenancy information, login to your OCI cloud account and select the tenancy from under your profile. Once on the tenancy details page, there is a tab called “Tenancy Information”. On this tab, copy the OCID. This OCID needs to be placed in the Terraform variables file.

Tenancy OCID from OCI Console:
1. Open the navigation menu, under Governance and Administration, go to Administration and click Tenancy Details.
2. The tenancy OCID is shown under Tenancy Information. Click Copy
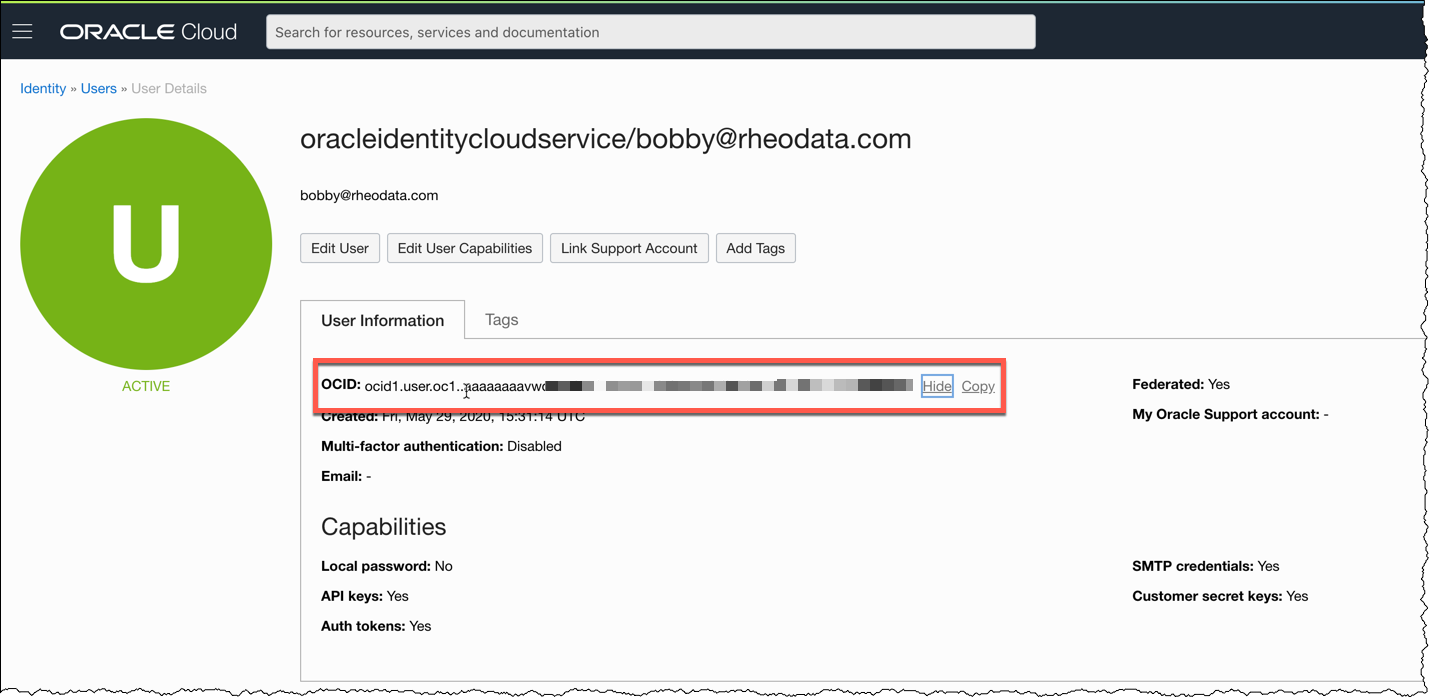
To ensure user access, grap the OCID for your user. This is often found by accessing the Profile section and then clicking User Settings. This OCID will need to be added to the Terraform variables files as well.

These same details can be accessed in the following way:
1. Under Governance and Administration, go to Identity and click Users
2. The user OCID is shown under User Information
The fingerprint info that is needed can be found on the User details page as well. It is generated after you have uploaded a public key to OCI. This fingerprint is used for you to validate login while using and accessing APIs. After uploading a public_key, the fingerprint is provided. This string of characters and numbers need to be copied to the Terraform variables file.

After gathering up the information that I just pointed out, the next item that has to be added to the Terraform variables file is the location of the private key. This location is typically located somewhere on your local hard drive, especially if you are using Terraform OSS to build out the infrastructure. In my case this location is ~/.ssh/<private_key>.pem.
The last piece of information needed is the region which to build workloads in. In most cases this is your default region; however, you can subscribe to other regions and build workloads in those as well. For the purpose of demoing and testing, I keep all of my items in the Ashburn data centers (us-ashburn-1).
With all the required information gathered and the OCI provider built inside of a main.tf, additional code has to be written to confirm that the connection is successful. In order to do this, I wrote a main.tf file that looks similar to the below structure. Now I’m using a “module” concept here, but that is only to break up my code and that can be discussed later.
provider "oci" {
version = ">= 3.76.0"
region = var.region
tenancy_ocid = var.tenancy_ocid
user_ocid = var.user_ocid
fingerprint = var.fingerprint
private_key_path = var.private_key_path
}

module "identity" {
source = "./modules/identity/info"
}

output "user_api_info" {
value = module.identity.user_api_info
}
With everything written, I just have to initialize the environment (terraform init), then perform a plan (terraform plan), and lastly apply (terraform apply). If everything is sucessful, I should get output that is related to the user I’m connecting to OCI with.
Bobbys-MacBook-Pro:OCI bocurtis$ terraform apply
module.identity.data.oci_identity_api_keys.test_api_keys: Refreshing state...

Apply complete! Resources: 0 added, 0 changed, 0 destroyed.
output:
user_api_info = [
{
"fingerprint" = “..:16:cd:13:46:98:15:cb:18:cc:e8:44:52:cd:..:.."
"id" = "ocid1.tenancy.oc1..aaaaaaaaojorxdfprzt2sx75lweivou6xeomto4gvjxuuyraxcdakff4dujq/ocid1.user.oc1..aaaaaaaavwqmadvq4geqqzog3xlcszpsh4b54wsc*************
"inactive_status" = ""
"key_value" = "-----BEGIN PUBLIC KEY-----\nMIIBIjANBgkqhkiG9w0BAQEFAAOCAQ8AMIIBCgKCAQEAwcXkeqP+XDlMnTWY4B3j\npgztL3Ed22zl5HomRVEmnM+ZhdStmhFj9uvZT+wU22GCJ+hfZyYCjdxGkaAgKf/R\nV1hMJ4kUx+XepTvdUx6Inu5hL5KevM7uGMFyxxgTgma4lgsYgF+*********************************************************************+UI5q6VS68HM\nioch9pNiwiC5frNkudmqpGBVOvGaCoayM8e1maivz3o4UgOYGcOwEIR14uMq/nrs\nRm1b/bbn+hRTQ1K8K5uWxiu8GV8B4IJCIf/xpLTvHiZ1ws+GITnOZBrPM8/J+ayc\nPwIDAQAB\n-----END PUBLIC KEY-----"
"state" = "ACTIVE"
"time_created" = "2020-06-07 01:14:24.08 +0000 UTC"
"user_id" = "ocid1.user.oc1..aaaaaaaavwqmadvq4geqqzog3xlcszpsh4b54wsc#######################"
},
]In this blog post, I wanted to show how to configure the Terraform Provider for OCI. As was discussed it really is not that hard once you know where to find the correct information needed. Additionally, the same information is used to make the connection for the OCI command line tools as well. Meaning that if you have the OCI command line tool already installed and configured, you have all the information you need.
Hopefully, this post will be useful to others who are trying to interact with OCI via the Terraform Provider.
Enjoy!!
Over the last couple of posts, we’ve been showing how to use the OCI provider and upgrading the...
Oracle Cloud Infrastructure (OCI) is a good platform for many things including building enterprise...
A couple of weeks ago Oracle released Oracle GoldenGate Service (aka. Oracle GoldenGate Cloud...